SI-CRE-FC4 (Beta) Cost To Complete (Billed Hours and Amount)
Applies to
- Product version: Velixo NX
- ERP: Sage Intacct
- Functional areas: Financials (GL, Budget), Project, Purchasing
- Industry: Construction
- Template type: Production Report template
Important Note: This Template is offered as Beta, until it receives sufficient validation and feedback.
Description
The Cost to Complete (Billed Hours and Amount) Report Template is tailored for construction companies and Cost-Plus or Time and Materials (T&M) contract types. It is considered an essential tool for project managers to:
- manage the various costs associated with the various cost codes of a project
- track progress over time
- analyze key financial and project data to ensure the project remains on-time and within contractual budget
- forecast the Cost at Completion as well as the projected Over/Under value of a project, supported by an optional user-input Cost to Complete amount and a user-input Labor Unit Hours field
- push the Cost at Completion Project Estimate to Sage Intacct as a Forecast, and optionally also as a Project Forecast Budget
This report automatically calculates the Cost at Completion based on the actual Cost to Date and Commitments yet to be Invoiced.
Two user-input metrics (a Cost To Complete amount, and Labor unit cost calculated from a quantity of hours * a labor rate) are then added to this value in order to vary the calculated Cost at Completion.
Use of this Cost to Complete (Billed Hours and Amount) method means that for each reporting period, every cost code item that has incurred cost must be reviewed by a project manager and an accountant.
Note: This Cost to Complete Template is also offered in different versions:
- Cost to Complete (Percent-based), which uses a "Percent Complete" percentage to vary Cost at Completion
- Cost at Completion (Manual), which calculates Cost to Complete backward from a manually specified Cost at Completion
- Cost at Completion (Amount), which uses a user-input Cost to Complete amount to vary Cost at Completion
Coverage
This workbook includes the following sheets:
Cost to Complete: the main sheet of the Workbook, the Cost-to-Complete sheet displays various balances by cost code and let a project manager or accountant push the new Project Estimate to Sage Intacct, as a Project Estimate Forecast and optionally as a Project Estimate Budget too, using the Velixo Project Estimate Writeback function.
Project Status: provides a summarized overview of the project, including billings, various metrics, statuses and schedules.
Rate-to-Cost Code Mapping: used for assigning standard cost codes to specific labor rates..
Labor Rates: a table that displays labor rates based on the selected Rate Table ID.
Options: the template’s settings sheet that is used for data validation lists (hidden) and various lookups and configurations.
Information: the information sheet of the report, used for storing useful details about the report such as code, version, and article link to keep track of the origin of the report.
Typical audience
The typical users of this type of report are Project Managers. Accountants and Finance professionals may also use this Template to write back to Sage Intacct.
Features
The following features are used by this report. To use this report, please ensure that your Velixo license includes all of them, (or contact Support or Sales):
- Financial functions
- List functions
- Query functions
- Project Estimate Writeback
Preview

Download this template

💡Having trouble downloading the file?
Simply right-click on the link and select Save link as
Important Note: every sheet of this Template is locked and protected by default, with no password (blank) by default. To unlock a sheet, simply go to the Review tab and select the "Unprotect Sheet" option (or right click a Sheet and select "Unprotect").
Documentation
The SI-CRE-FC4 Cost to Complete (Billed Hours and Amount) template is designed for tracking and forecasting the costs of a Cost-Plus or Time and Materials project.
Unlike other Cost to Template Templates, this template requires users to map the Cost code of a project to a specific Labor rate "key" (representing one of more columns of the Timesheet Rate table object). The granularity of such key is defined as a setting in the Options sheet, and is used to calculated the Labor Billed amount (from a user-input quantity of hours).
The resulting Cost at Completion can then be pushed back to Sage Intacct as a set of Forecast estimate entries, for each cost code.
Cost To Complete sheet
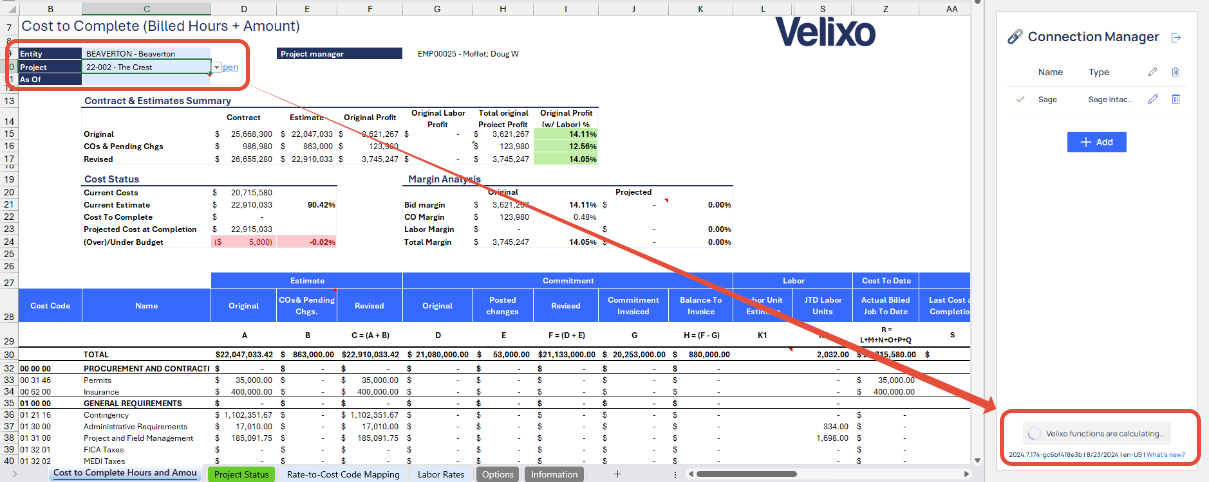
Filters
Located in the upper left of the sheet, the filters include:
- Entity: lists all entities present in Sage Instance (excluding groups). For ease of use, Velixo shows you the Entity id that you may be familiar with along with the entity name.
- Project: a dropdown list of all the available projects in the Sage instance. When a project is selected, the Project Manager field is automatically populated, allowing for easy identification of the primary contact for the project.
- As of: a date field. If left blank, it will default to the current date.
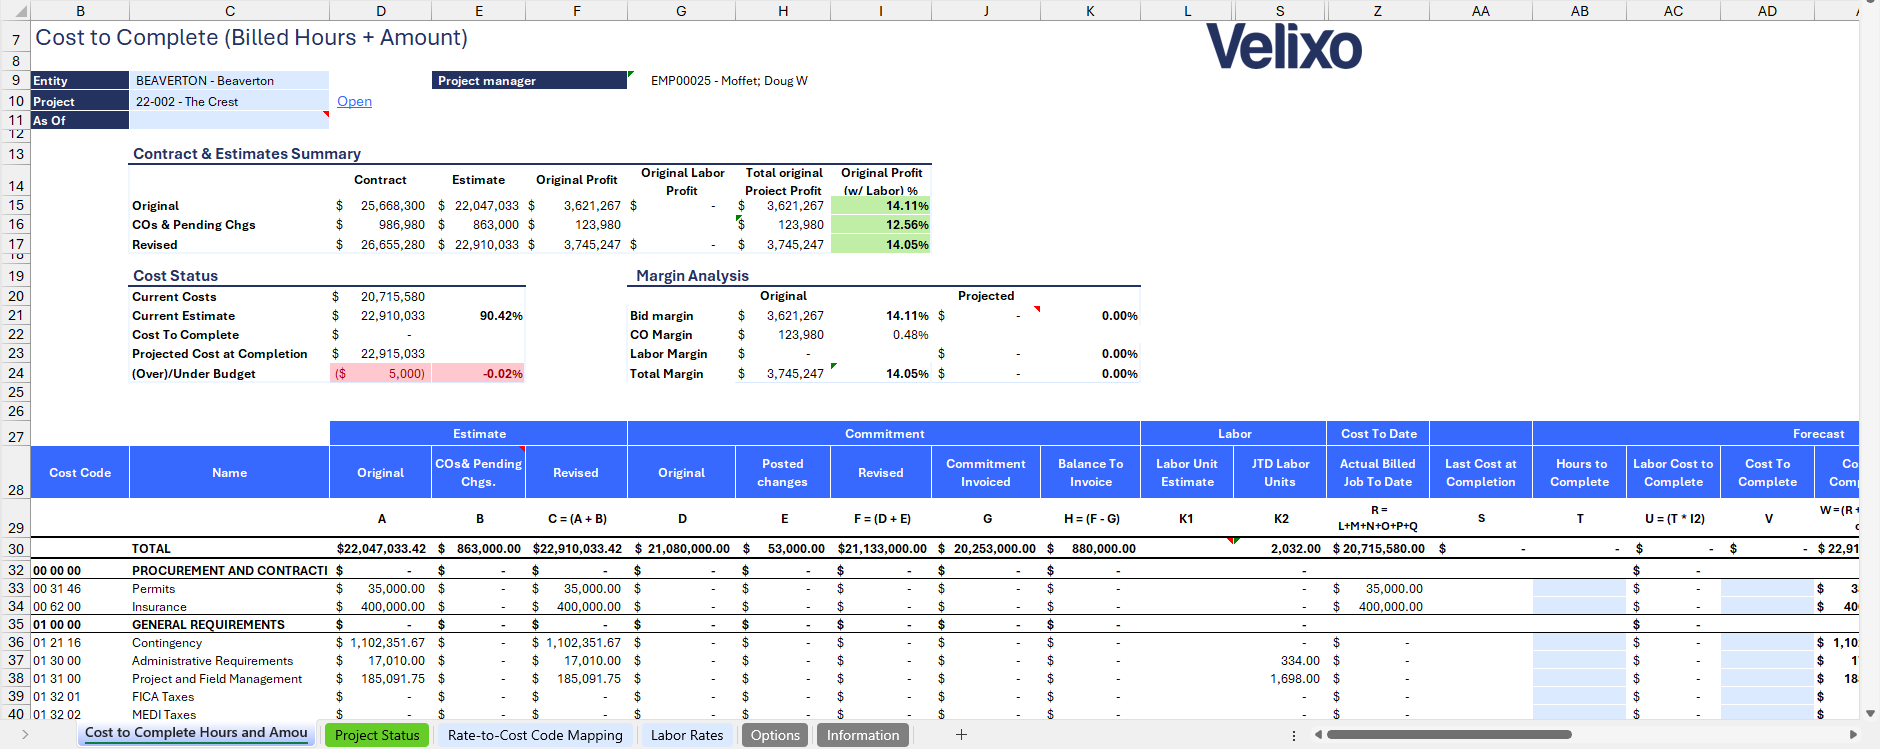
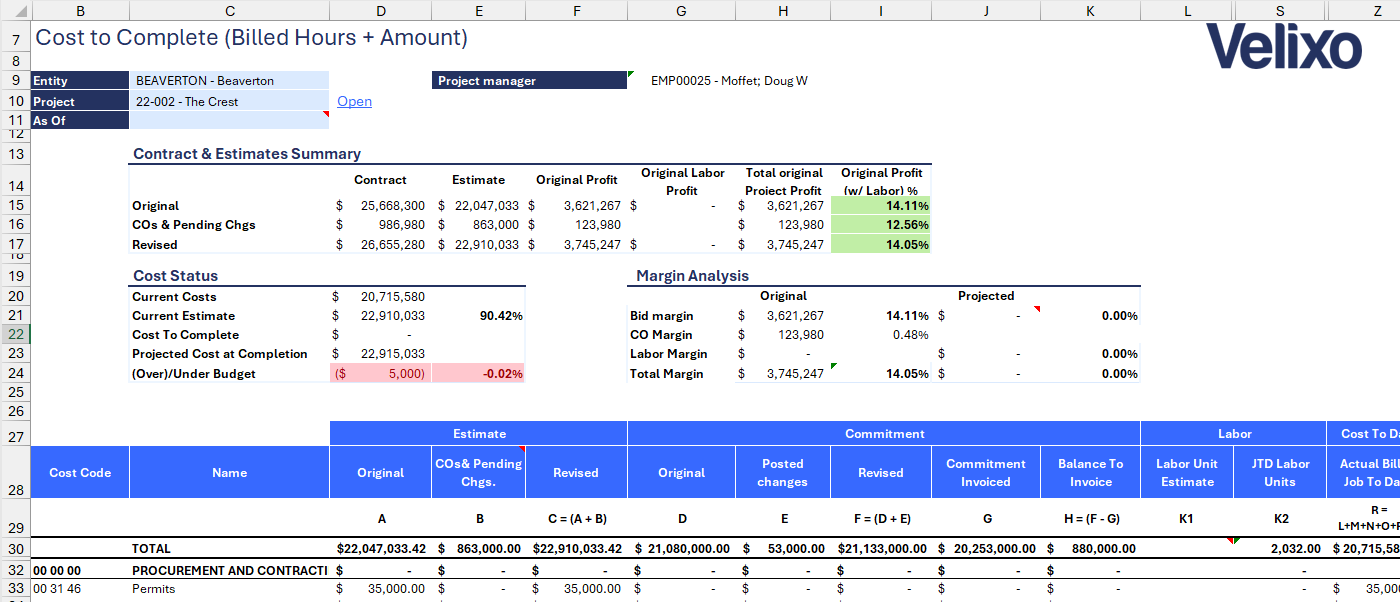
Summary area
This area highlights the key KPIs of a Project, summarizing various figures, as calculated in the main report section:
- Contract and Estimates Summary: this section displays the difference between the contract price and the total project estimates. It also includes the profit margin amount and percentage, offering insights into the project's margin based on the estimates.
- the Contract column is based on information extracted from the Contract object
- the Estimate column is based on the Total cells of the report in the Estimate section, which is extracted directly from the Primary Project Estimate
- the Original Labor Profit is the difference between the estimated Labor amount and the calculated Labor amount (using the Labor rate as mapped in the Rate-to-Cost Mapping sheet)
- the Total original Project Profit: sums the Original Profit and the Original Labor Profit amounts
- The Original Profit (w/ Labor) % then calculates the profit margin as a percentage.
- Schedule: this section compares the key dates of the project, originating from the Project Contract. scheduled start and completion dates in the contract and the total project estimates.
- Start date: For both Estimated and Revised columns, the Scheduled Start date is used. If Scheduled Start date is not specified, the Actual Start date is used. For the Actual column, the Actual Start date is used
- Completion: For Scheduled Completion date is used for Estimated column. For the Revised column, the Revised Completion Date is used unless it is not specified, in which case the Schedule Start date is used
- Days: returns the number of days between the start date and the completion date, or today's date if the project doesn't have an Actual completion date
- Cost Status: provides an overview of the current costs incurred compared to the project estimates. It includes details on the actual costs, remaining budget, and percentage of costs utilized, giving users a clear view of the project's financial status.
- Margin Analysis: this offers an in-depth look at the project's profitability by comparing estimated margins with actual margins. It includes details on the profit margin, change order margin, adjusted margin amount and percentage.
- Original Bid margin: is the Original Profit
- Original Labor Margin: is the calculated Original Labor Profit margin total, defined in column R of the main report section
- Original CO Margin: is the Original Profit for COs (and also includes Pending changes)
- Projected (incl. Fee) Big margin: is the Original Contract Profit minus the Projected Cost at Completion, times 1+FEE, corresponding to the markup applied to Cost-Plus contract types. FEE is a Name that is set to 0% by default, meaning that the template can also be used for Time & materials projects.

Main report
This section provides the report breakdown by cost codes, including detailed information on estimates, commitments, costs to date, and forecasts.
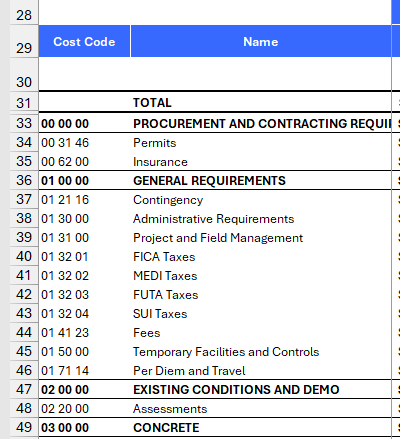
Cost codes
The first two columns of the report return a dynamic list of cost code for the selected project, which includes headers.
Headers are conditional formatted in bold with Top and Bottom borders to clearly differentiate with the main cost codes.
This includes the TOTAL row that returns the aggregated value of every relevant metric of the report. Values from this row are also used in the Project Summary section located above the main report area.
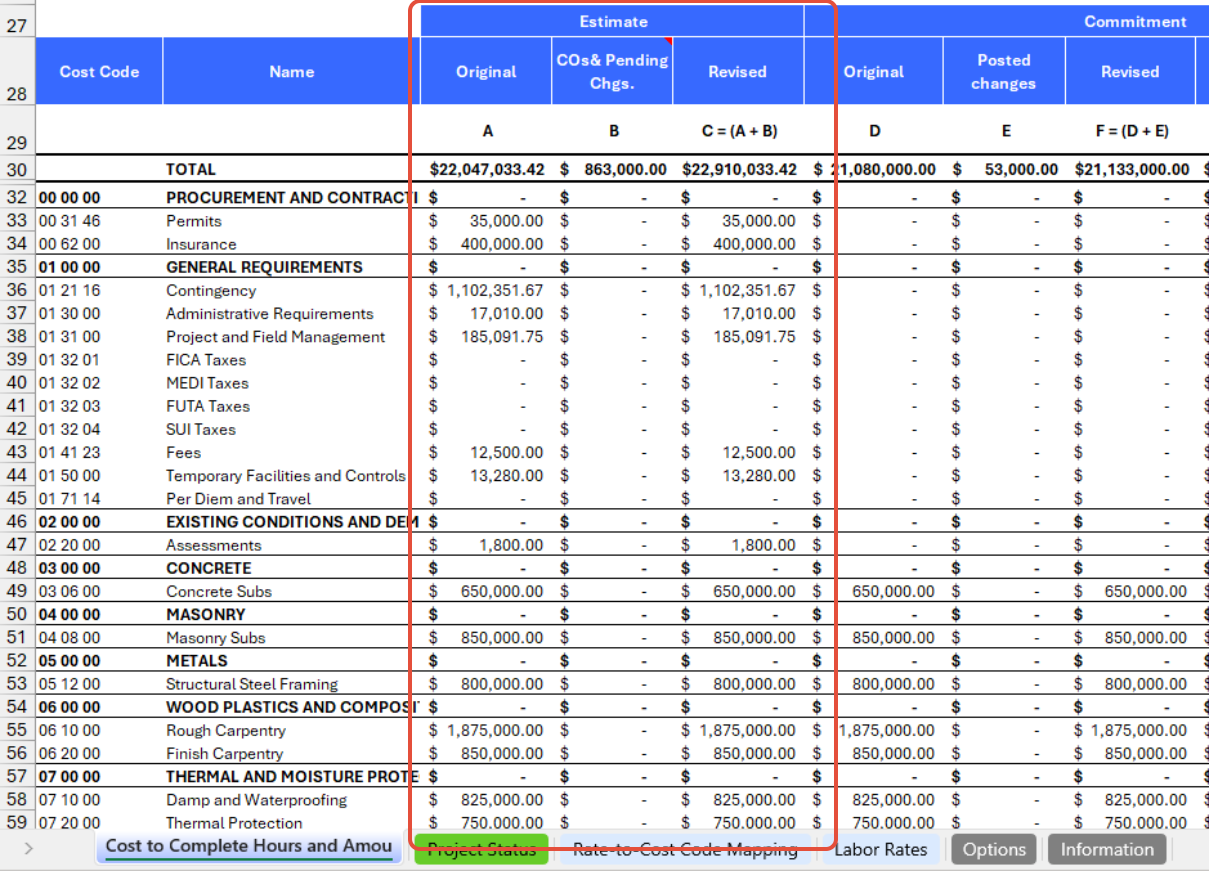
Estimates
The Estimates section details all of the various project estimates of the project for each cost code, estimated including Original, Change Orders, Revised, and Pending. These numbers are extracted using the SI.PROJECTESTIMATE function for the relevant Cost code using the relevant Workflow Type.
- Original (A): Uses the Original Workflow Type
- Change Orders (B1): Uses the Approved Orders Workflow Type
- Revised (C): does not use the function, but instead sum the Original and Change Orders numbers.
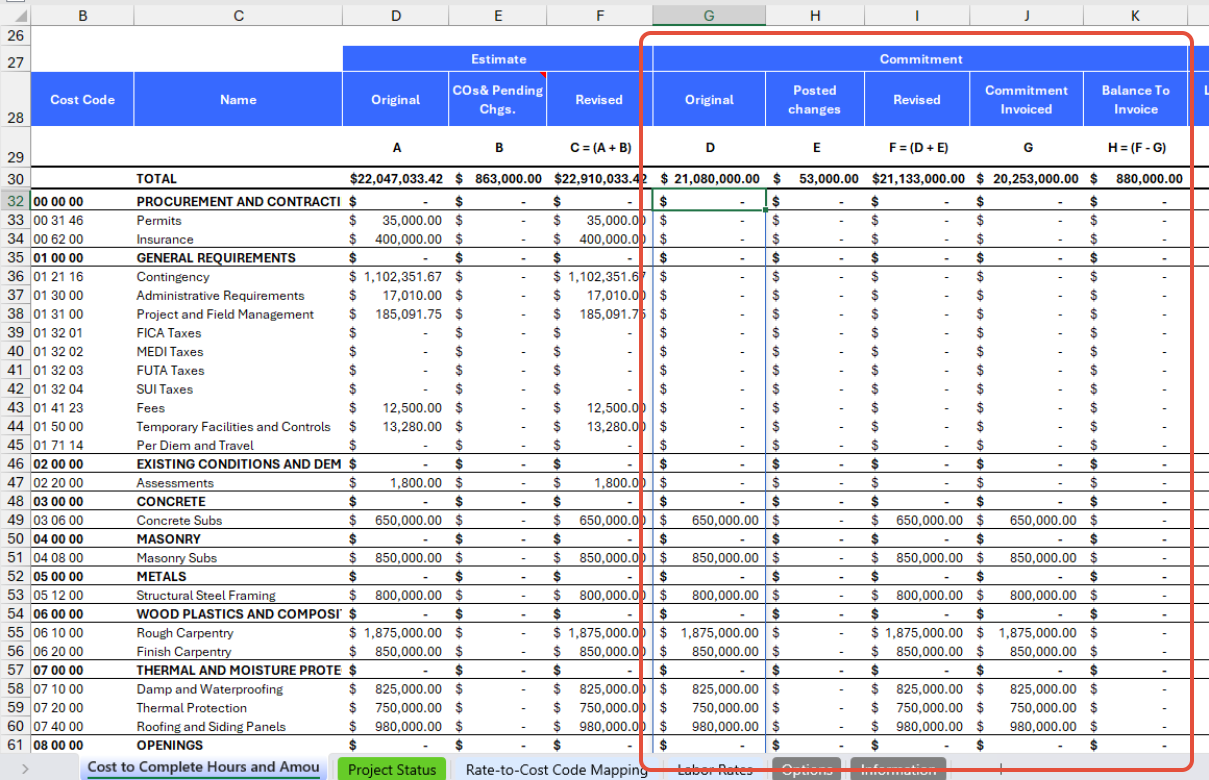
Commitments
The Commitment section includes several Commitment metrics that are essential for tracking all purchase orders, subcontract orders and invoices by cost codes and as a whole.
To offer Velixo drilldown, these figures are extracted from the General Ledger, and therefore require Project-related POs and Subcontract Orders and Invoices to synchronize with their corresponding Sage Intacct books (which is a standard feature of Sage Intacct). If this setting is not enabled in your instance, please contact your partner or Velixo Support.
- Original (D): show commitment amounts for Purchase Order and Subcontract Order document types, posting to the GL against the following books: Purch Orders and Subcontracts
- Posted changes (E): show commitment amounts for PO Changed Order and Subcontract Change Order document types, posting to the GL against the following books: PO CO and Sub CO
- Revised (F): is the Sum of Original and Posted changes
- Commitment Invoiced (G): show commitment amounts for purchase orders that have been invoiced, have an AP Bill and have been posted to the GL against books: Sub Reversal, and PO Reversal
- Balance To Invoice (H): is the commitment amount that is yet to be billed, and is simply calculated as the difference between Revised (F) and Commitment Invoiced (G)
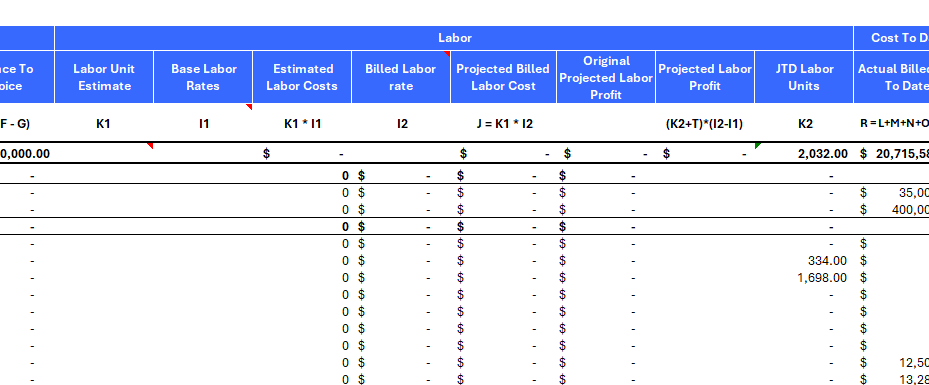
Labor
By default, this section only displays 2 columns. It can be expanded horizontally to display the below 8 metrics as columns.
- Labor Unit Estimate (K1): represents the estimated labor units required for the project, sourced from the SI.ProjectEstimateQuantity function and workflow types: Original, Approved changes.
- Base Labor Rates (I1): is a lookup value from the Rate table of the Labor Rates sheet, and as per the mapping provided in the Rate-to-Cost Code Mapping. Please navigate to the Rate-to-Cost Code Mapping sheet of this document for more details.
- Estimated Labor Costs (K1 * I1): is calculated by multiplying the Labor Unit Estimate with the Base Labor Rate column.
- Billed Labor rate (I2): is a calculated field that divides the revised Estimate amount (SI.ProjectEstimateAmount) by the revised Estimate quantity (SI.ProjectEstimateQuantity), if applicable.
- Projected Billed Labor Cost (J): is a calculated field that multiplies Labor Unit Estimate (K1) with Billed Labor rate (I2)
- Original Projected Labor Profit: is a calculated field that substracts Estimated Labor Costs from Projected Billed Labor Cost (J)
- Projected Labor Profit: is a calculated field that uses the following formula to calculate Projected Labor Profit: (K2+T)*(I2-I1), with T being the user-input Hours to Complete column.
- JTD Labor Unit (K2): is the total actual labor units (hours) to date, sourced from the GL (Accrual Book) and the following Statistical accounts: BNULT and BUTLT
Cost To Date
This section represents the actual costs incurred up to the As of date filter (since the project inception).
Actual Costs are extracted from the GL using the Accrual book.
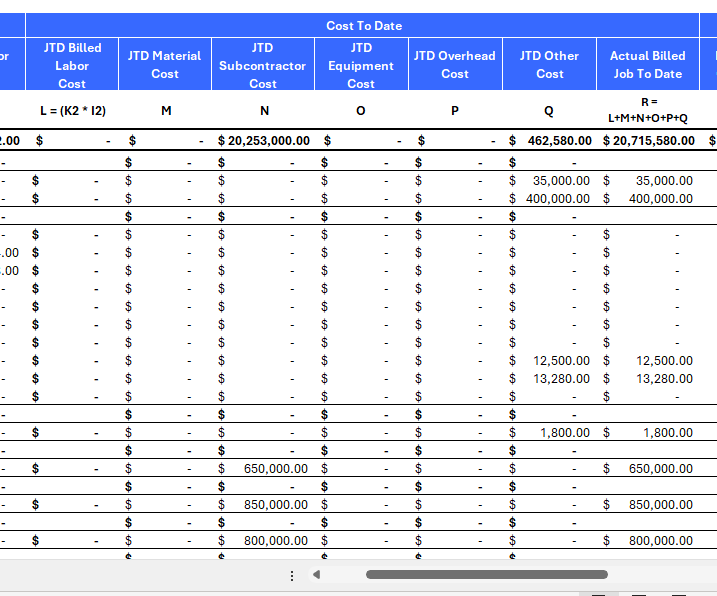
Note: All Commitment and Actual Cost amounts are extracted from the General Ledger accounts associated with the following out-of-the-box QuickStart account categories (which can be reconfigured in the report if needed):
- Cost of Sales - Materials
- Cost of Sales - Labor
- Cost of Sales - Equipment
- Cost of Sales - Subcontract
- Cost of Sales - Other
- Cost of Sales - Overhead
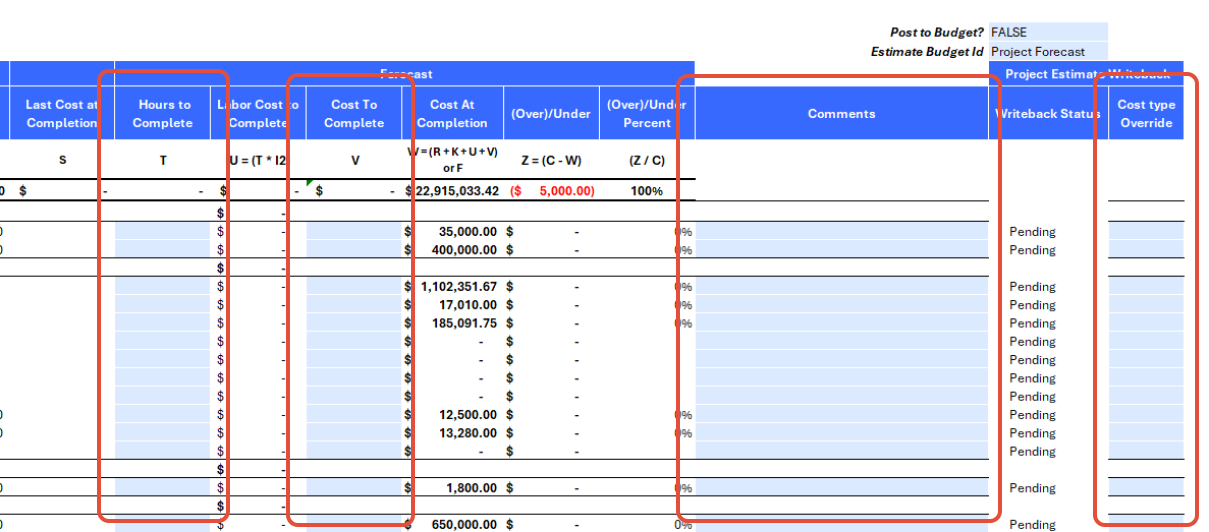
Forecast
This section displays the forecasted Cost at Completion and the derived (Over)/Under calculations.
- Last Cost at Completion (S): is an informative-only column that helps in the process of forecasting. It will return values only if an Estimate Id is specified in Cell AA27. This value may either be manually populated by a user, or is automatically populated after a successful Writeback action
- Hours to Complete (T): a simple user-input Hours column that users can use to adjust the Cost at Completion values for each Cost code.
- Labor Cost to Complete (U): the amount derived from multiplying the specified Hours to Complete (T) with the Billed Labor rate (I2)
- Cost To Complete: a simple user-input Amount column that users can use to adjust the Cost at Completion values for each Cost Code
- Cost at Completion (W): is a calculated field that returns the greatest amount among:
- the Project Revised Estimate (including Pending Changes)
- the sum of: Job To Date (R), Balance to Invoice (H), Cost to Complete (V) and Labor Cost to Complete (U)
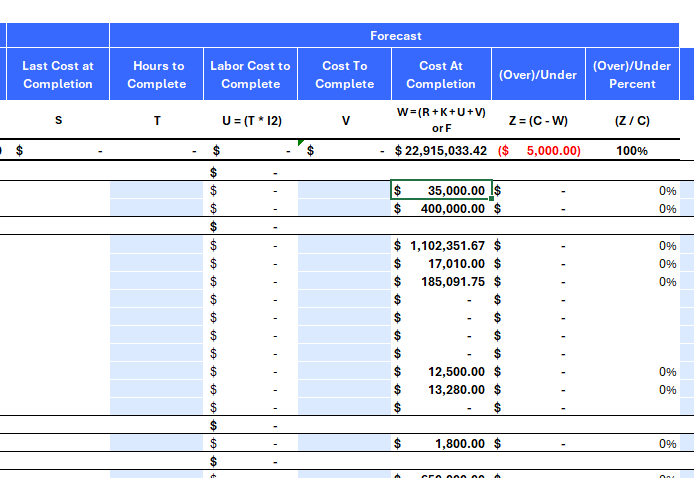
- (Over)/Under: simply calculated the difference between the Revised Estimate (C) and Cost at Completion (W)
- (Over)/Under Percent: is the variance percent between the Revised Estimate (C) and Cost at Completion (W)
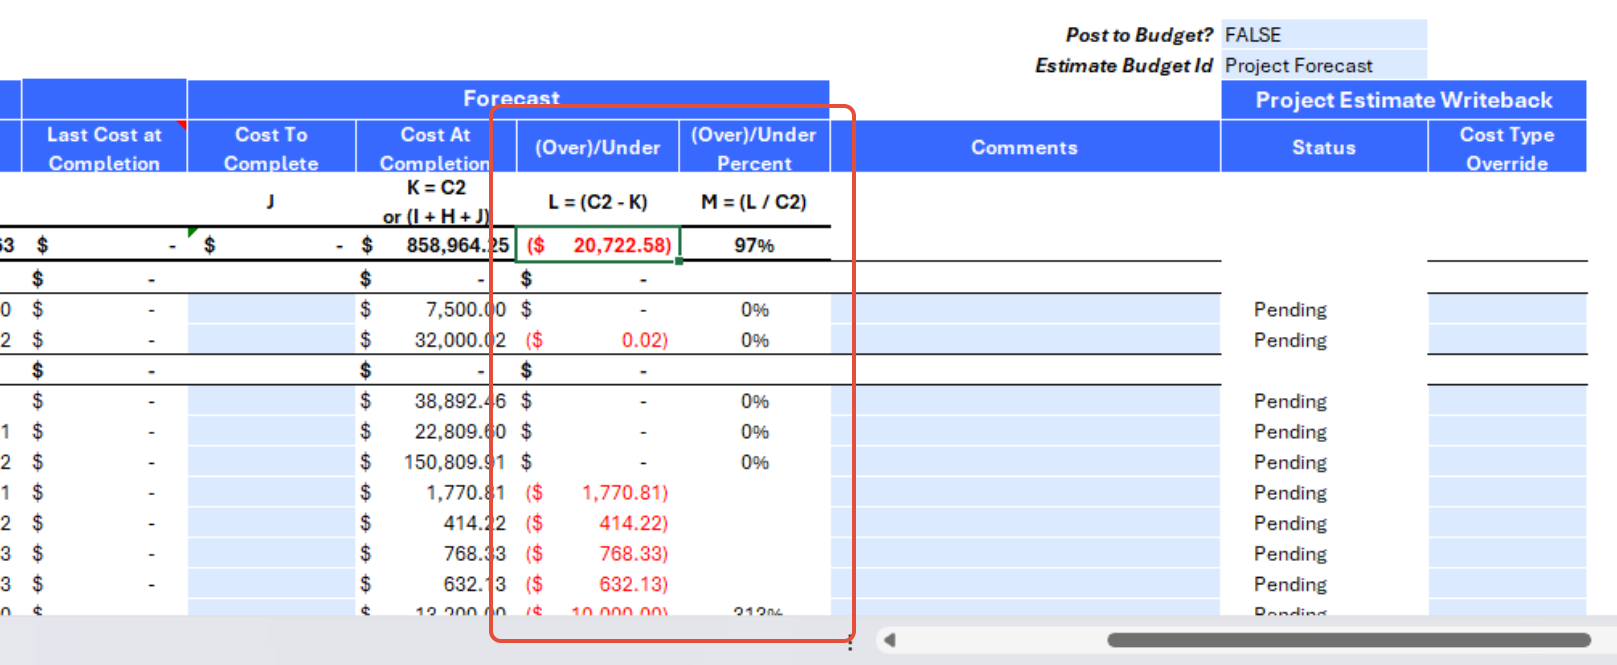
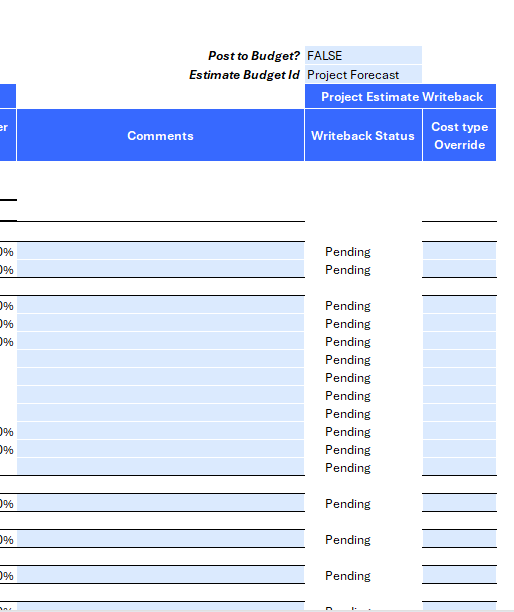
Project Estimate Writeback
This section includes Velixo's SI.WRITEBACKPROJECTESTIMATE function and two other columns. It is used to perform writeback action to push the Cost at Completion figures for each cost code for that given project to a new Project Estimate in Sage Intacct. It also includes various configurations, some of which may be optional depending on your Sage Intacct setup and internal processes.
- Comments: a user-input field, corresponding to the memo field of a Project Estimate entry.
- Status: the status of the Velixo Writeback function. This will show "Pending" when the function is ready to perform a Writeback action or "Line Uploaded" after a successful writeback action, or an error if it requires further actions from the user. See the Using the report section for more details.
- Post to Budget: a boolean True/False dropdown list. Although most users would want to turn it to True for the Estimate to also post as a Budget, it defaults to False.
- Cost Type Override: provides a dropdown list of all the cost codes relevant to the project. This field is optional for some cost codes, but mandatory for some other cost codes if the Post to Budget? selection is turned to TRUE:
- Posting to GL Budget requires specifying a Cost type (this is not a requirement for a Project Estimate)
- The Template includes an Option for specifying a Default Cost Type (set to: OTH, by default corresponding to Other in the Sage Intacct demonstration instance)
- When the OTH Cost type is not used for a given Cost code, an error will appear in the Status column for that specific Cost code row, requiring the user to "override" the OTH Cost type with a Cost type from the Cost Type Override dropdown list
The Velixo writeback function pushes the following data to Sage Intacct:
- Estimate level:
- Estimate date and Effective Date: uses the As Of date specified in the report (as entered in Cell 11). If empty, today's date is used
- Estimate type: uses Sage Intacct's estimate type: Current Forecast - At Completion (as configured in Cell X3)
- Estimate description: uses a pre-defined and configurable formula specified in Cell C5 that concatenates the following words or values: "Forecast", <Estimate date>, "Budget Id"
- Estimate Id: if auto-sequencing of Estimate Id applies to your Sage instance (recommended), then set the Manually name Estimate Id? setting in Cell X2 to TRUE, this will use the Estimate Id name pattern setting as the EstimateId that Velixo will create in Sage Intacct.
- Estimate entry level:
- Line description: uses the Comments value of the current row
- Cost code id: use the cost code of the current row
- Cost at Completion (T)
- In addition to the above values, the following budget-specific fields are also used when Post to Budget? is TRUE:
- Budget Id, as specified in Estimate Budget Id in Cell X27
- Cost Type Id, uses the default Cost code as specified in the Options sheet (defaults to "OTH") or a manually specified Cost Code as selected in the Cost Type Override dropdown list by a user.
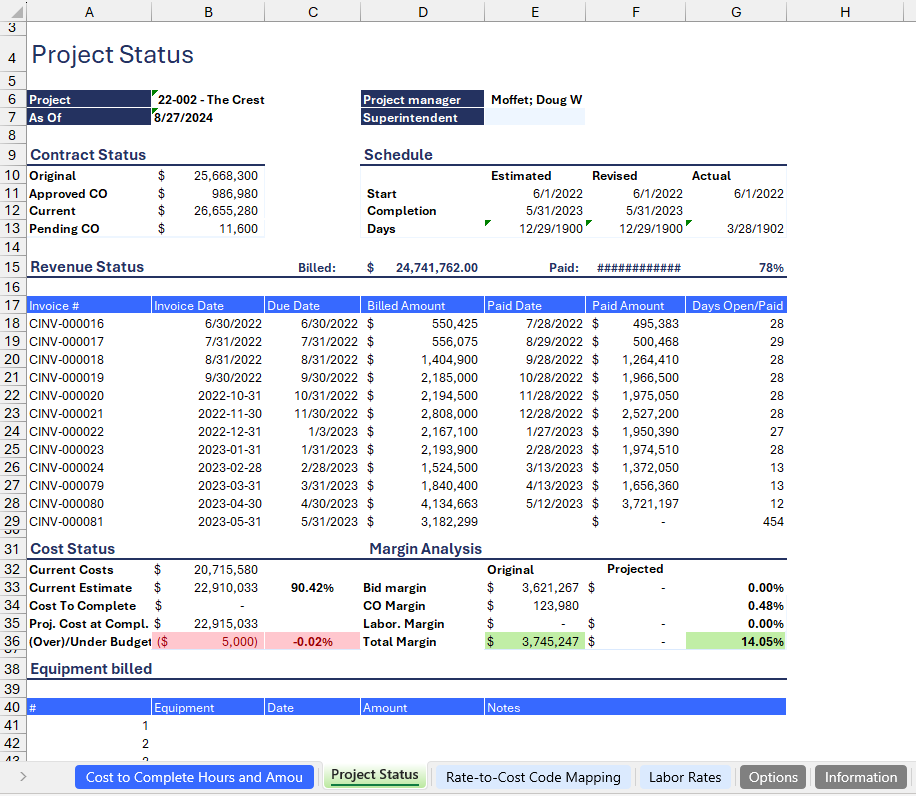
Project Status sheet
As an additional feature, Velixo includes a Project Status sheet for internal consumption by a Construction business, that offers a high-level overview of the project, by:
- summarizing all key metrics of the project, along with supported information such as Schedules in a printable format
- providing extra focus on cash flow by listing all AR invoices of the project. Similar to the project summary in the main report, it includes additional details such as a list of all invoices submitted and processed during the project phase.
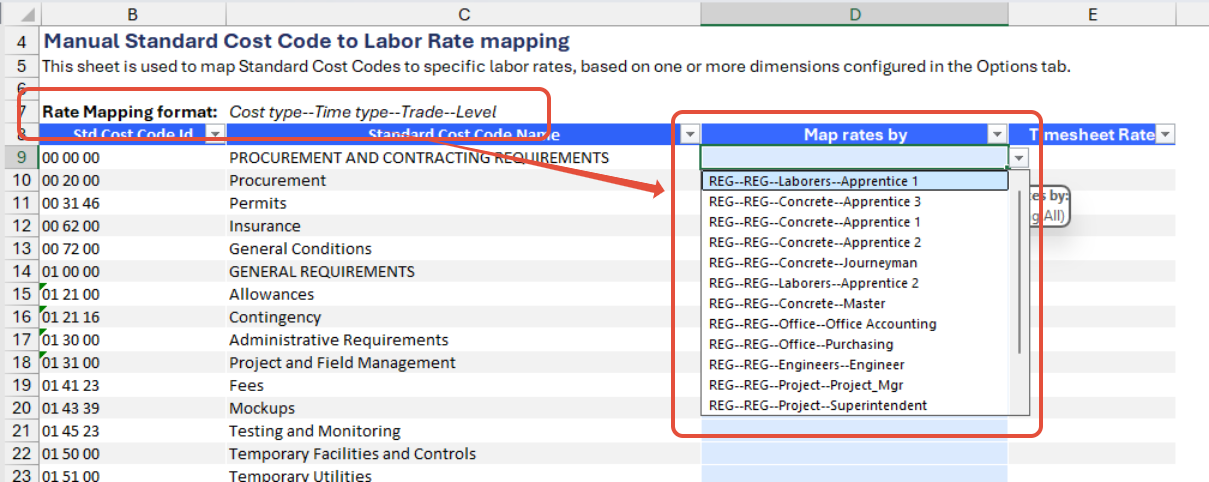
Rate-to-Cost Code Mapping
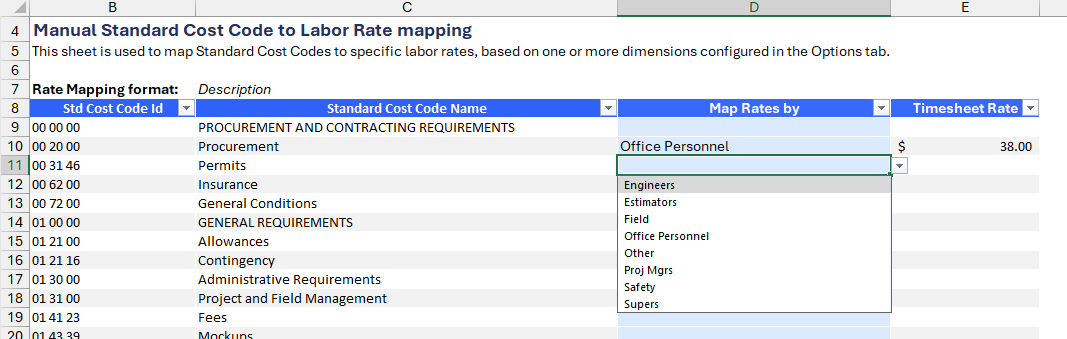
This sheet maps Standard Cost Codes to specific labor rates, based on dimensions configured in the Options tab. Users assign rates, according to the dimensions selected on the rates table, to each standard cost code.
- Std Cost Code Id: the standard cost code pulled directly from Sage Intacct.
- Standard Cost Code Name: the name associated with the Standard Cost Code Id.
- Map Rates By: a dropdown list of dimensions or combinations of dimensions used to assign labor rates to the standard cost code.
- Timesheet Rate: the labor rate corresponding to the values selected in the Map Rates By column.
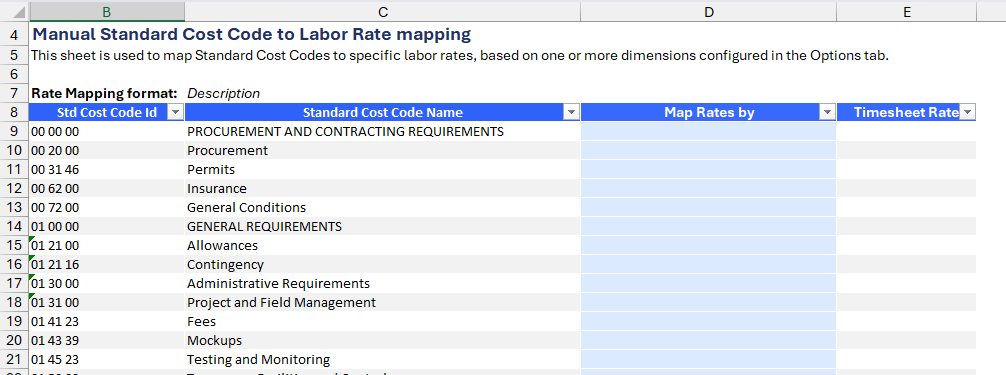
For the Map Rates by column, a Rate Mapping Format guide is included on the sheet to help users understand the format of the values that will be assigned to each cost code for rate identification.
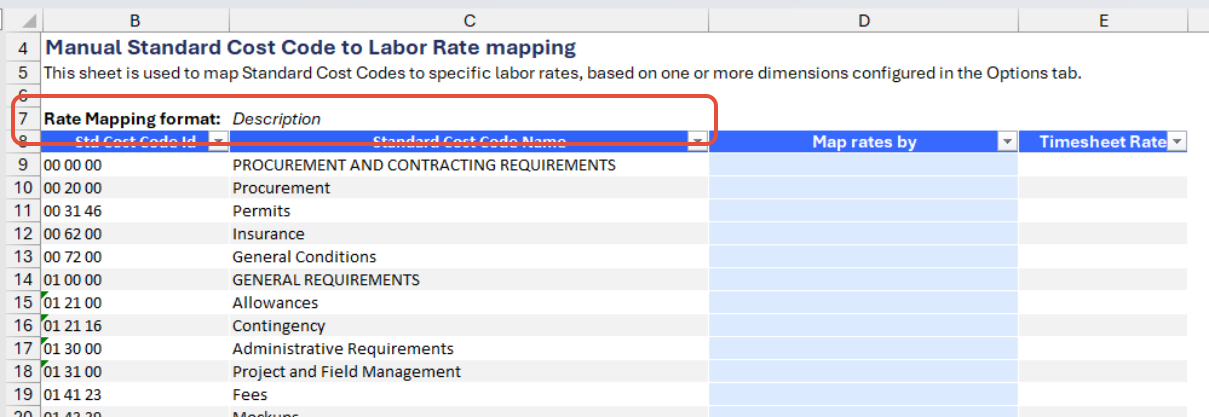
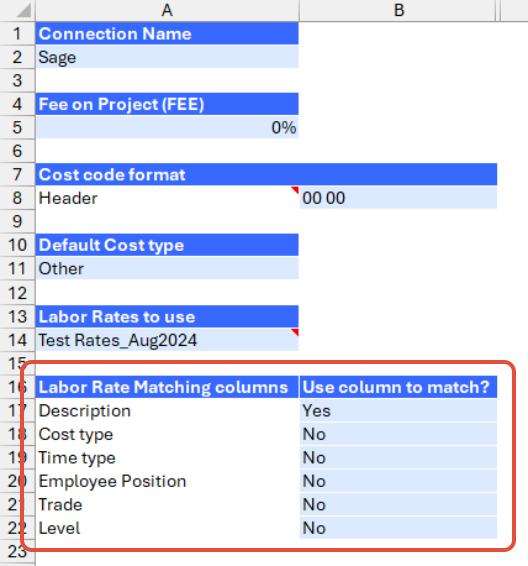
The Rate Mapping Format is driven by the dimensions selected on the Options sheet. By default, it is set to Description, but users can choose either or a combination of the following dimensions:
- Description
- Cost type
- Time type
- Employee position
- Trade
- Level
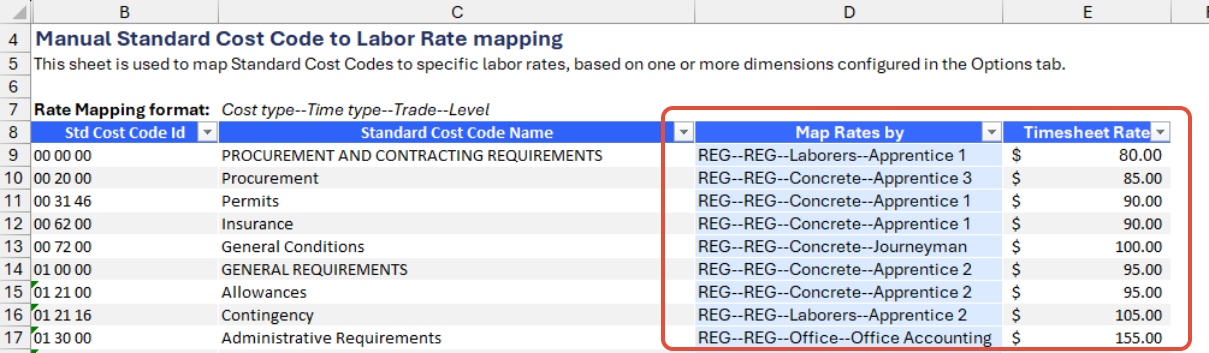
Here is an example of the mapping with dimensions selected in addition to Description:
As illustrated above, the first value represents the Cost Type, followed by Time Type, Trade, and finally Level. These values are concatenated using a double hyphen (--) symbol.
Selecting a value in the Map Rates By column will automatically populate the Timesheet Rate column with the corresponding rates from the Labor Rates table.
Configuring the report
Now that we've covered all the fields and purpose of the Template, let's now dive into a step-by-step guide on effectively utilizing the report.
Standard configuration
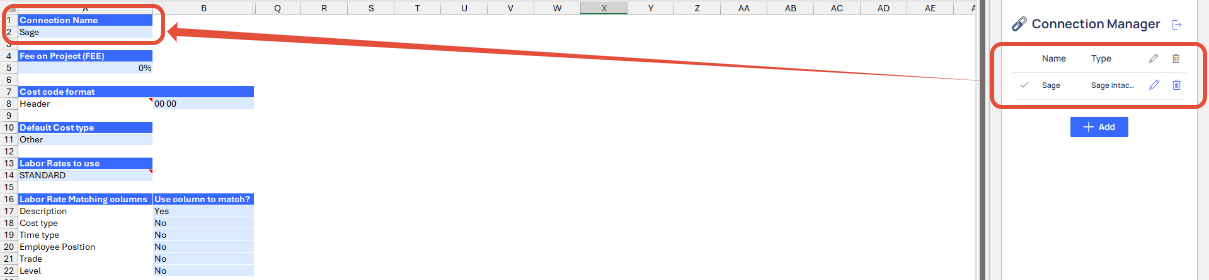
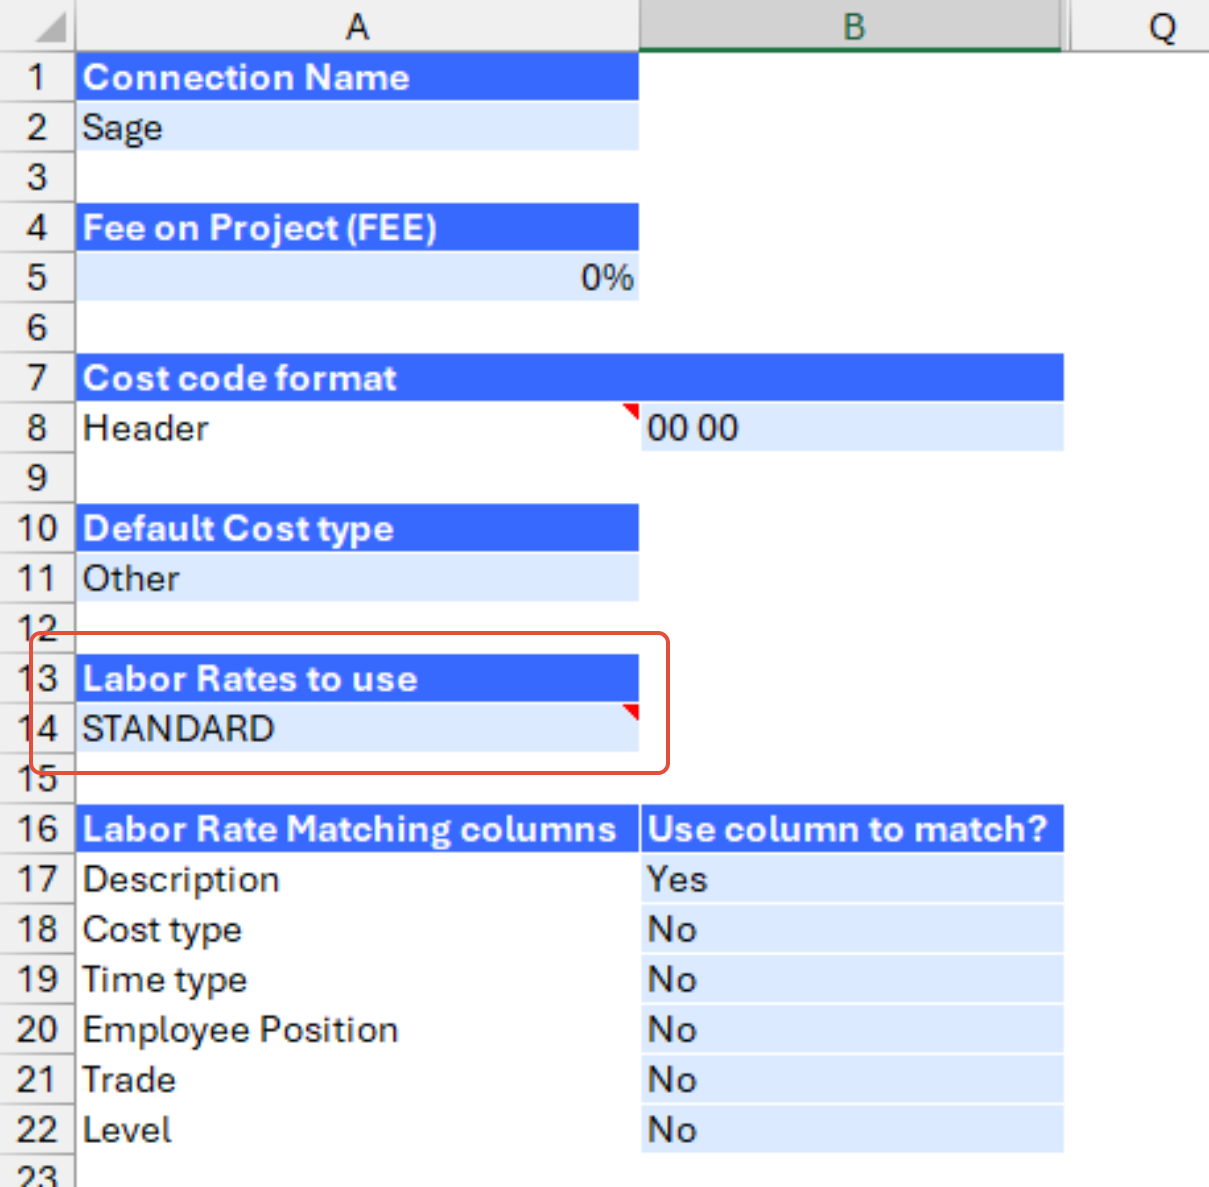
- Set the Connection Name on the Options sheet: crucial for all processes, set the Connection Name on the Options sheet by updating cell A2. Ensure it matches the name used during Velixo application login.
- Configure the Fee on Project field: for projects using Cost-Plus contract types, update the FEE field in the Options sheet
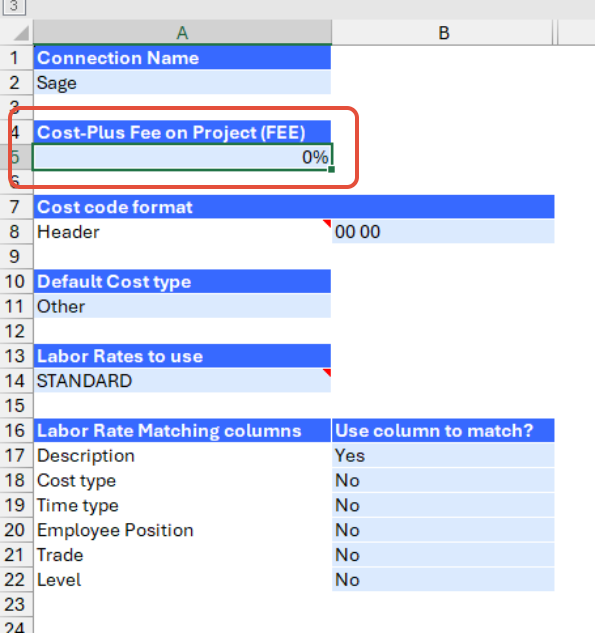
Note: This field is only used in cells J21 and J23 of the main Cost to Complete sheet, to add this fee markup to the Projected margin in the Summary section of the report.
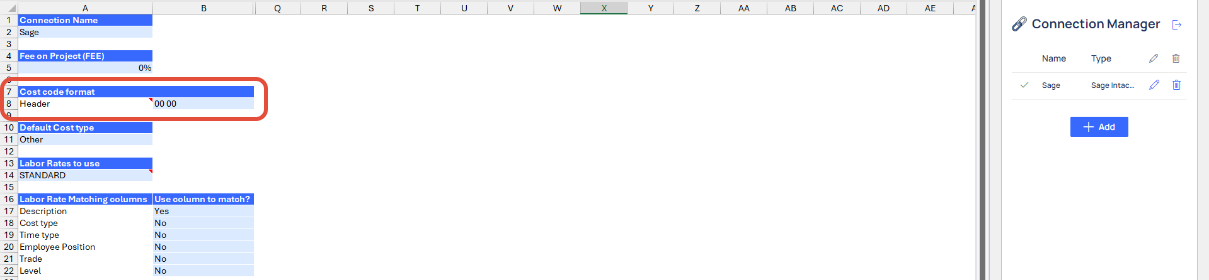
- Specify the cost code header format: by default, this template uses the cost code header format from the standard Sage Instance demo instance. If the last 4 digits of a Cost Code are 0s (zeros), it usually means a Cost Code is a Cost Code Header used for grouping Cost Codes. This is what Velixo uses to conditionally format Cost Code rows in the main report. Please review this setting and match the format to the Cost Code sequence of your Sage Intacct instance in order to leverage this conditional formatting.
- Update the Options Sheet: as the foundation for the filters on the main report, keep the Options sheet up to date. It should always and automatically capture the latest dimensions and structures from your Sage Intacct instance.
- Review the parameters for the Commitments and Cost to date balances (optional): expand the grouped rows from rows 1 to 6 to display additional configurations such as: account codes and books. Those values should be standard yet users can still modify them:
- Account codes: this is set to default based on the mapped account codes to the following QuickStart categories. Users can opt to use account groups as an alternative.
- Cost of Sales - Materials
- Cost of Sales - Labor
- Cost of Sales - Equipment
- Cost of Sales - Subcontract
- Cost of Sales - Other
- Cost of Sales - Overhead
- Account codes: this is set to default based on the mapped account codes to the following QuickStart categories. Users can opt to use account groups as an alternative.

- Books: the report comes pre-configured with default books that correspond to the standard user-defined books in the Sage instance. This setup is designed to work seamlessly out-of-the-box, however, the report still allows users to modify these settings as needed.

- Review the Project Estimate Writeback settings: As mentioned earlier in this document, this template includes the ability to push Project Estimates as Forecasts to Sage Intacct using the writeback functionality. To view the Writeback options, collapse rows 1 to 6 and navigate to column W:
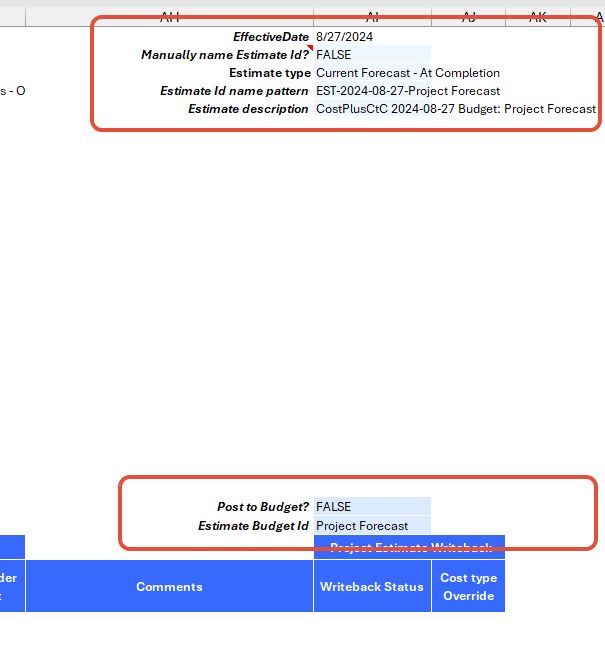
- Effective Date: This is automatically set to the "as of" date specified in the filter.
- Manually name Estimate Id?: Toggle between TRUE or FALSE. Determines whether the Writeback procedure uses a default naming convention for the estimate. Default setting is FALSE.
- Estimate type: the type of estimate to be used once the data is uploaded to Sage.
- Estimate Id name pattern / description: If set to FALSE, the report assigns the name and description of the Estimate Id in the format: "Forecast" + As of Date + selected Estimate Budget Id (e.g., Forecast 2024-07-08 Project Forecast).
- Post to Budget?: Toggle to post the estimate to Budget. Default setting is FALSE.
- Estimate Budget Id: Specify the budget Id for posting the project estimate, applicable when "Manually name Estimate Id?" is set to TRUE.
Configuring Labor Rates
This is the Timesheet Labor Rates table extracted from Sage Intacct, serving as the source for rates in the Rate-to-Cost Code Mapping sheet.

By default, the template uses STANDARD as the Rate table ID. However, it is very likely that a different rate table name would be use.
Review and update the Rate Table ID, by editing the Labor Rates to Use field on the Options sheet.
Then based on your actual data in the Labor Rates table, and as described earlier in this documentation, review the columns that you maintain in the Rate tables and that should be used to map to Cost Code and extract the right rate.
- Navigate to the Rate-to-Cost Code Mapping sheet, then select a Labor rate "Key" for each cost code to map your Labor rate "Key" to all your project's Cost Codes.
Using the Report
As a project manager, this report would typically be used as follows:
Choose selections
- Choose desired filters: after updating the Options sheet, select desired filters for the report on the main sheet:
- Entity: select from the list of locations
- Project: select from the dropdown list
- As of: you may leave the field as a blank value for the report to use the current date
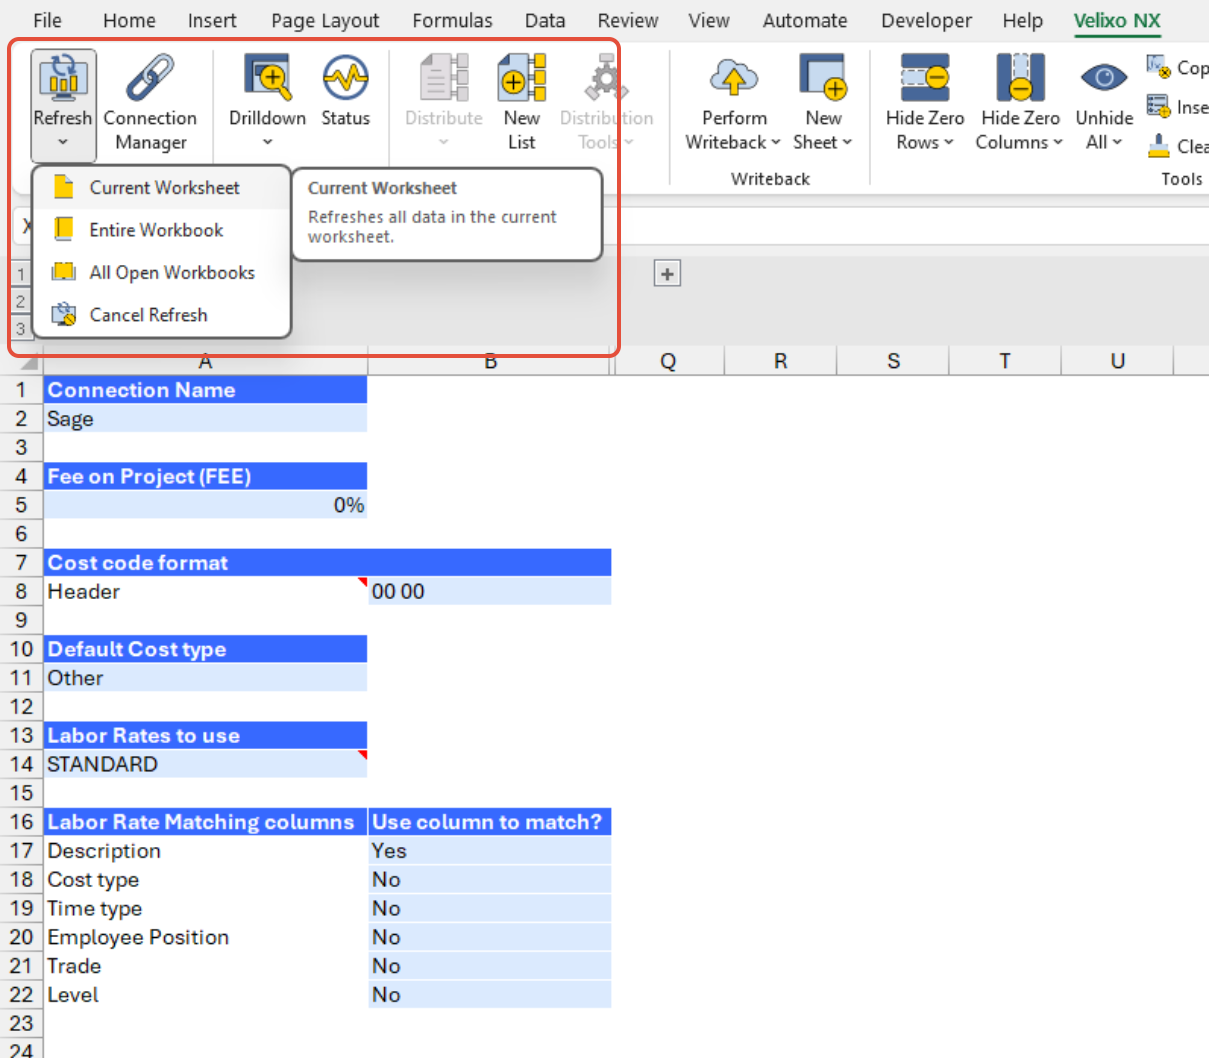
- Automatic report update: selecting any filter will automatically update report balances. Begin analyzing the report with the latest data after refresh. However, in some cases, you may have to refresh the entire workbook by clicking Refresh > Entire Workbook from the Velixo NX ribbon
Enter values
- Under the Forecast section, populate the highlighted-in-blue cells, as desired and corresponding to the value representing the remaining expected cost, for each Cost code row.
- Hours to Complete (optional): the additional labor hours required to complete the task. The specified values will be multiplied by the corresponding labor rates and added to the existing revised estimate.
- Cost to Complete (optional): the additional cost to complete the task. The amounts specified will be added to the existing revised estimate.
- Comments (optional): remarks for each of the line amounts specified
- Cost Type Override (optional): allows users to override the default cost type assigned to the cost code for the project estimate. If left blank, the default Cost type ("OTH"), or as specified in the Options sheet will be applied.
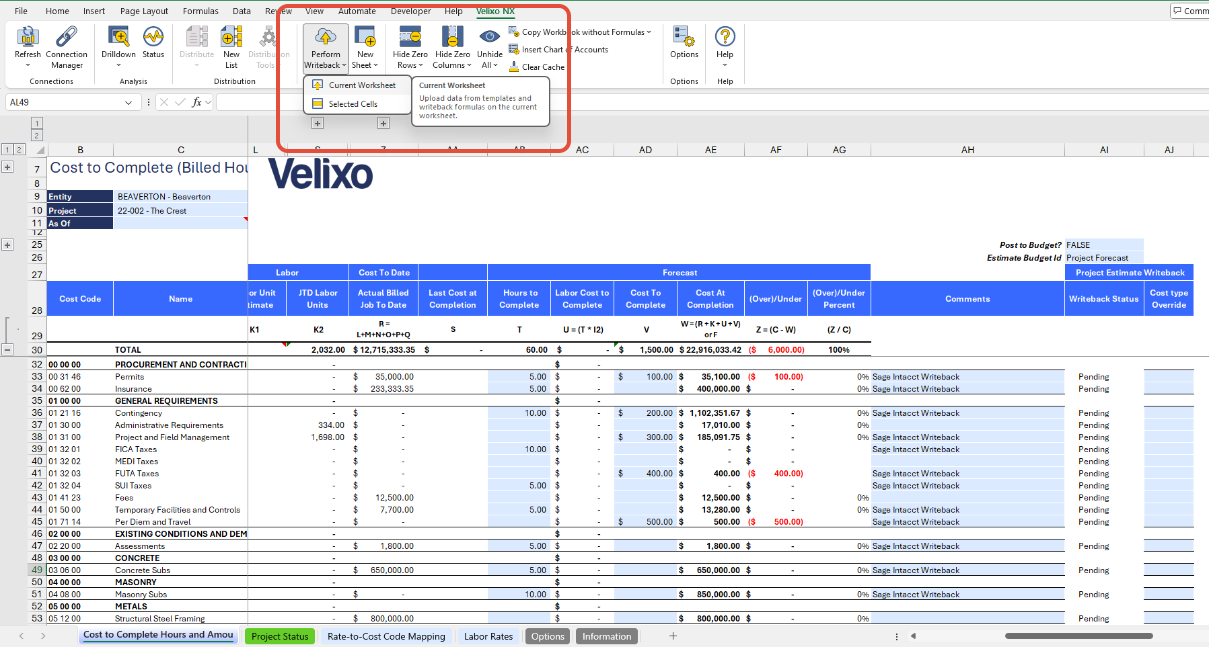
Perform Writeback
- Once the required details are populated and there are no errors in the Writeback Status column, you can perform the writeback action by clicking Current Writeback > Current Worksheet
- After completing the Writeback process, the Status in column AI will change to "Line uploaded" for each cost code row
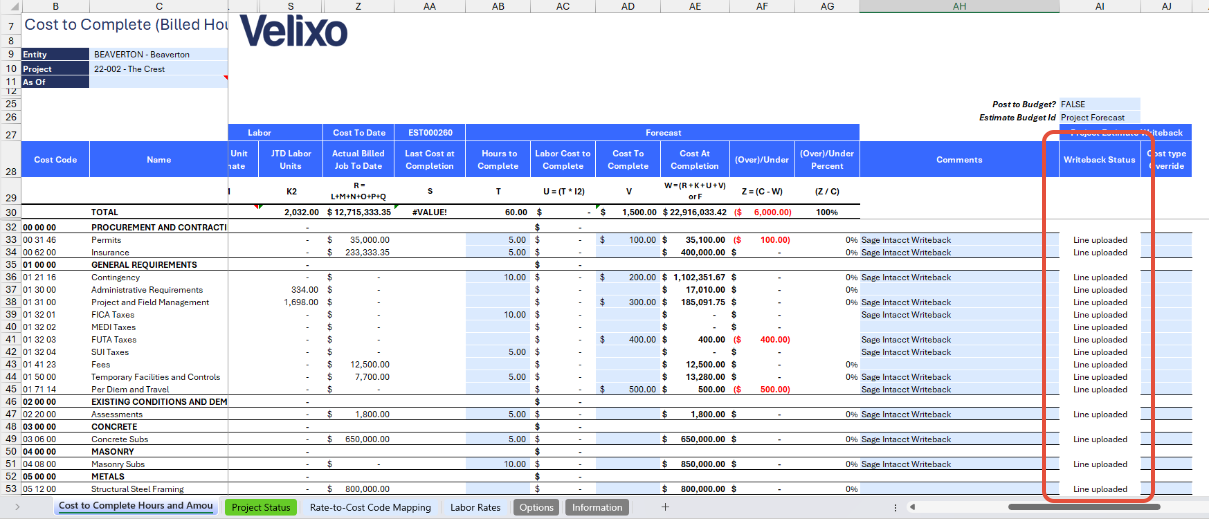
- Finally, refresh the Cost to Complete sheet to update the Last Cost at Completion column with the newly uploaded balances.
Note: The Last Cost at Completion is calculated based on the latest estimate ID in Sage Intacct. However, estimate ID can still be manually entered in cell P28.

Version History
| Version | Released on | Changes |
| 1 (Beta) | August 23, 2024 | N/A. Initial version of this template. |
| 1.1 (Beta) | October 02, 2024 |
|